What’s this post for?
As one of the most important parts of UI/UX design in UWP platform, the significant of Composition API has been referred several times in the Build sessions. I have decided to learn about and to use Composition API to improve app’s experience. I’ll share what I’ve learnt from the sessions and official docs here as a note for myself as well as a jumpstart guide for other developers who is interested in this area.
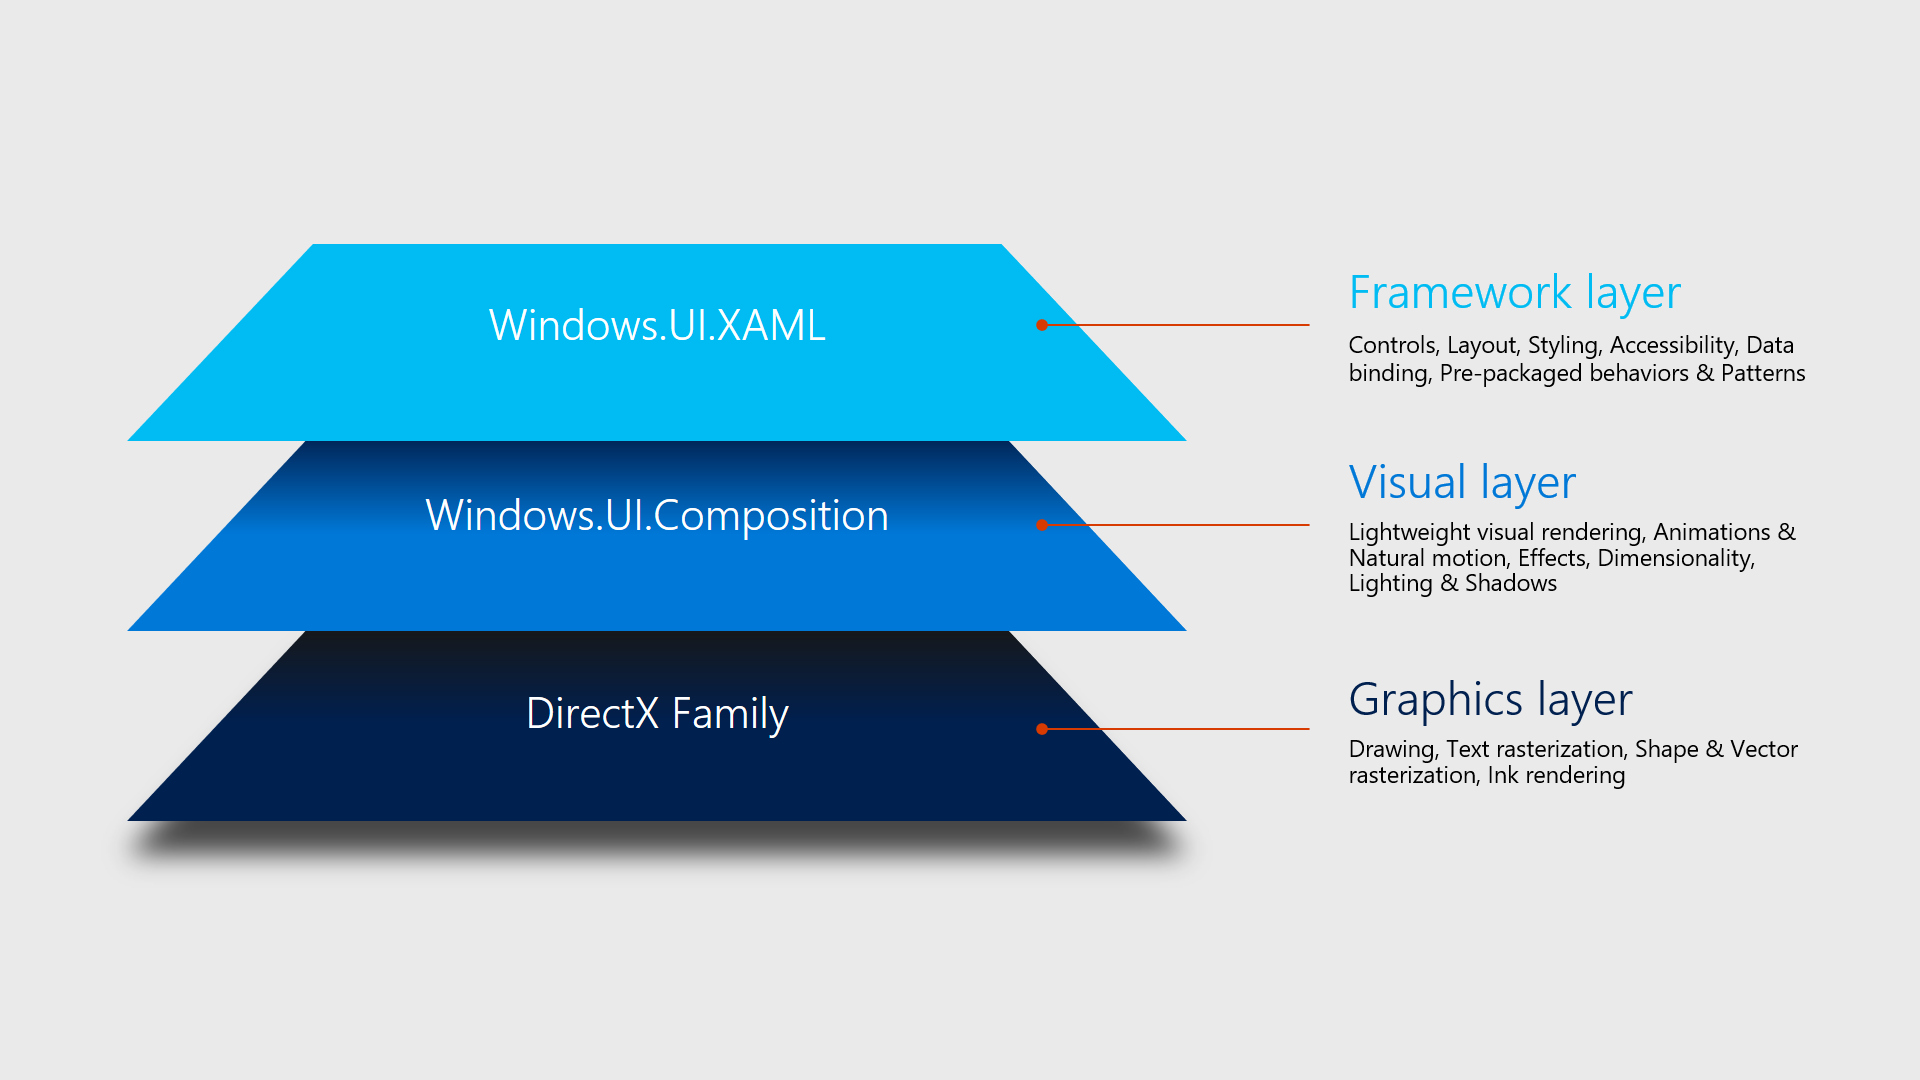
Starting with a slide that we all familiar with
As far as I concerned, we’d better start from some fundamentals including the layering of the UI framework, what the Windows.UI.Composition can do and the visual family. Let’s take a look at this slide at first. It’s a slide which frequently appears in the sessions and keynotes in Microsoft’s developer events. This chart perfectly presents which layer Composition API is in and why it is recommended for creating UI effects and animations.
Because the Composition API works in the visual layer that will get developers closer to the metal. By doing this, developers are enabled to get both great visual performance and experience.
With the Composition API, we can make the experience of our applications better by bringing these incredible effects to our apps.
The ‘Visual’ family
After having a glance at the Composition API, we can start learning it by getting familiar with the Visual family .
Visual is the most fundamental part in Windows.UI.Composition which indicates a visual element that can be displayed on users’ screen. You can simply regard every UI Element in your UWP as a visual. In fact, you can get a corresponding Visual for every UIElement by calling the method GetElementVisual(UIElement).
We’ve known what Visual is. What about the Visual family?
The visual family is made up of Visual, ContainerVisual
and SpriteVisual.
SpriteVisual inherits from ContainerVisual which hosts 2D boxed content of type CompositionBrush and is commonly used for creating effects such as blur.
ContainerVisual inherits from the base Visual class which indicates a node of a visual tree that can have children.
There are some properties in Visual. These properties can be used to create animations. They are Opacity, Offset, Clip, CenterPoint, TransformMatrix, Size, Scale, RotationAxis, RotationAngle.
Hand-out visual and Hand-in visual
Hand-out
Just like what I said in the previous paragraph, each XAML UIElement have a corresponding Visual. This visual is called hand-out visual. We can grab the hand-out visual of a UIElement by calling the method
1 | ElementCompositionPreview.GetElementVisual(UIElement); |
And before we are able to call that method, we need to add these references to the top of your source code:
1 | using Windows.UI.Composition; |
Hand-in
We can grab the visual of an UIElement. Likewise, we can take a Visual we have created and add it to a UIElement’s visual tree. When a Visual is added in this way, it is called a hand-in Visual.
1 | ElementCompositionPreview.SetElementChildVisual(UIElement, Visual); |
Property sharing
Property sharing happens in hand-out visuals. Some properties are shared between the XAML UIElement and the Composition API so that the Visual will react synchronously while the properties in the UIElement changes. However, the flow of property flows one direction. Visual can read the property changes from the UIElment while the UIElement won’t read the changes made to the hand-out visual.
Not every properties shares. Only the properties may affect the Visual’s size, transform matrix, clip, offset, composite mode will be shared.
It often leads to some tricky problems but we can avoid those unexpected behaviors by putting the UIElement into a wrapper Grid or a Border.
You can get more information about property sharing and the latest changes on XAML Composition interop behavior by visiting https://github.com/Microsoft/WindowsCompositionSamples/wiki/XAML-Composition-Interop-Behavior-Changes
Practical - Blur
Image Blur
What we gonna to do next is to add a blur effect to a picture, which sounds like a simple work.
I’d like to show the demo first.
To finish the work, we generally need six steps:
First, get the host visual(the hand-out visual of the image you want to add blur to) and the compositor.
1 | Visual hostVisual = ElementCompositionPreview.GetElementVisual(Image1); |
Then, describe the blur effect using Win2D
1 | var blurEffect = new GaussianBlurEffect |
Create the effect brush
1 | var effectFactory = comp.CreateEffectFactory(blurEffect,new[] { "Blur.BlurAmount" }); |
Create the backdrop brush and bind it to the “backdropBrush” parameter
1 | var backdropBrush = comp.CreateBackdropBrush(); |
Create the sprite visual and apply the brush we created just now to it (noticing that Vector2 requires two float numbers so we need a type converting)
1 | var blurVisual = comp.CreateSpriteVisual(); |
Finally, add the visual to the host visual
1 | ElementCompositionPreview.SetElementChildVisual(Image1, blurVisual); |
Transparent window
Just like what we did to the picture, we can also make a window transparent and add blur effect to it.
We should get the compositor first as usual.
1 | _compositor = ElementCompositionPreview.GetElementVisual(this).Compositor; |
Then describe the blur effect
1 | var blurEffect = new GaussianBlurEffect() |
Create the effect brush
1 | var fac=_compositor.CreateEffectFactory(blurEffect); |
While adding a blur effect to a picture, we created a backdrop brush using
1 | var backdropBrush = comp.CreateBackdropBrush(); |
What is in difference with the previous time is that we are going to add the effect to the window instead of the image so we need to create a host backdrop brush.
1 | var backdropBrush = comp.CreateHostBackdropBrush(); |
Rest of the code is just the same.
1 | _spriteVisual = _compositor.CreateSpriteVisual(); |
We are almost done here. But you may notice that when you change the size of the window, the size of the sprite visual don’t change with it so we need to update the size of the sprite visual as soon as the size of the window changed.
1 | private void Page_SizeChanged(object sender, SizeChangedEventArgs e) |
Light

Some concepts
There are several kinds of lights in Composition API. They simulated the three kinds of lights in the real world.
Point lights
Point lights, literally, are the lights coming from a point, which have a position and give off light equally in all different directions. (e.g. lightbulb)
Directional lights
Directional lights have direction, but no position. They emit parallel light. All light emitted from a directional light travels in the same direction. (e.g. sun)
Spotlights
Spotlights have both position and direction in which they produce light. (e.g. flashlight)
Create light effect
The way of creating a light effect is a little bit different from what we did before while creating a blur effect. We don’t need to describe the effect with Win2D. Instead, we can simply create the light effect from the compositor using the code below.
1 | _compositor.CreatePointLight(); |
If you want to create other kinds of lights, you just need to replace the CreatePointLight() with CreateDistantLight() or CreateSpotLight().
Apply the light effect
Let’s take point light as the example. After creating the light, we need to add a few parameters and apply it to our target image.
1 | var lightRoot = ElementCompositionPreview.GetElementVisual(sample_img); |
Then, we should specify the Offset property to set the position of the light.
1 | _pointLight.Offset = new Vector3(x, y, z); |
Make the light move with your cursor
This can be achieved simply by changing the offset in real time when your cursor moves.
1 | private void sample_img_PointerMoved(object sender, PointerRoutedEventArgs e) |
Drop shadow
We’ve talked about two types of effects: Blur and Shadow. Here’s another type of effect which is also widespread used by many applications - Drop shadow effect.
It’s much easier to create a drop shadow in UWP with the help of Composition API. Actually we can do it by calling _compositor.CreateDropShadow(); with only a few lines of code.
First we need to grab the compositor and create a drop shadow with it.
1 | var compositor = ElementCompositionPreview.GetElementVisual(this).Compositor; |
Then create a sprite visual and apply the drop shadow to it.
1 | var spriteVisual = compositor.CreateSpriteVisual(); |
This will create a rectangular shadow by default. However, this doesn’t work for all cases since the shape of the target element may be different and a simple rectangular shadow is obviously not enough. To solve the problem, we only need to apply a mask to the shadow to shape it.
1 | shadow.Mask = sample_Ele.GetAlphaMask(); |
The method GetAlphaMask() will return a CompositionBrush which is used for shaping the shadow.
If you are dealing with a image, you can also get the shadow mask by calling:
1 | var imageSurface = LoadedImageSurface.StartLoadFromUri(new Uri("ms-appx:///Assets/image.png")); |
To render a shadow behind the specified element, create a Border and render the shadow inside the border instead of applying the shadow directly to the element.
1 | <Grid Name="shadowPanel" VerticalAlignment="Center" HorizontalAlignment="Center"> |